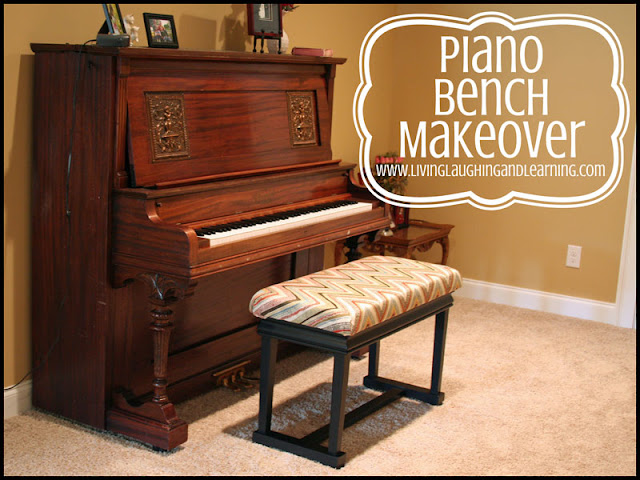
I love my piano.
When I was maybe around 8-9 years old my sister and I had two old upright pianos (one being a pea green) that my dad traded in for this one plus some cash.
I love its history (not that I really know it but just that it’s old and has a story if it could talk). I love its varnished metal (copper or brass?) plates, cherubs and all. I love its uniqueness.
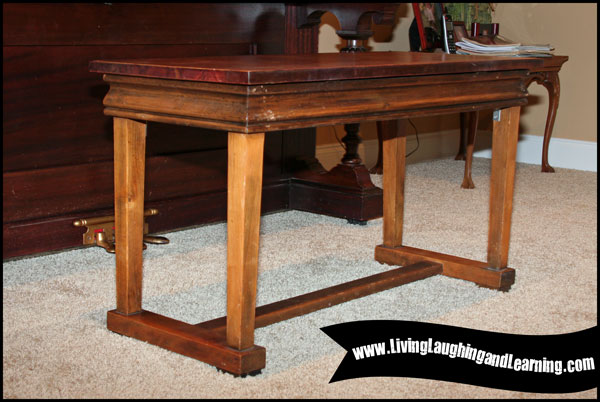
However, there’s the bench.
It went with one of the old pianos my family originally owned. So it’s old. And beaten up. And in need of makeover. (Man, I feel like those last three sentences just described me some days.)
Now my daughter, Elizabeth, uses the piano that I practiced on for years. She has taken piano lessons since 2007 and has really taken off in the last year. Now she enjoys playing which if any of you have kids that take music lessons know is a big deal. Once they get good enough where they enjoy it, you finally can breathe a sigh of relief. Not saying it means they want to practice daily for an hour, but it helps!
This whole piano alcove in our den needs a makeover but I’m starting slow. I’m starting with it.
I knew I wanted to add padding to it to make it more comfortable for the hours Elizabeth spends sitting on it. So first, I picked out a fun fabric that was approved of by Elizabeth since she does the piano playing here. Plus, I wanted a pattern that had lots of colors that I could have fun with as well as some of my favorites I already use in our den.
Next, I decided to go with a classic color for the wood – black. I know, I was playing it safe. However, my thought process is that if I want to change up the fabric later for a different look, I don’t want to have to also repaint the bench.
Lightly sanding the wood with a coarse grade sandpaper, I wanted to remove what was left of any urethane that’s at least 30 years old. This maybe took ten minutes then I wiped it off with a damp microfiber cloth.
Using wood putty I filled in some cracks and nail/screw holes. That took less than five minutes but I had to wait several minutes for it to dry before removing the excess.
A few hours later I got back to it and using a fine grade sandpaper, smoothed out the areas where I filled in places.
I gave the paint can a good shake, opened it, and applied my first light coat. Later I applied two more coats being careful there were not any runs. With all the angles there were plenty of places for runs to hide. I kept my brush in a tightly closed sandwich bag in between layers so I didn't have to clean it out each time - that is the one thing I hate about painting (clean up). I wish I had only bought a sample of the paint color instead of a quart as I barely used any. Oh well, I'll have it for future projects. ;)
To cover the top of the bench I marked lines along the large piece of foam and used a yardstick to draw a straight line to cut. I put it on the top and covered it with batting to smooth the edges. I stapled the batting on after taking the lid off the bench. (I tried to avoid this but there was no doing.)
Then I stapled the fabric on over the batting and foam making sure my pattern was straight and it was all pulled tight. The corners slowed me down the most and I’m not 100% happy with them but I’m trying to let go of perfectionism (and I also tell myself that the lighting isn’t as bright as the main level of our house – ha ha!).
Supplies used:
Voila!
Elizabeth and I are so happy with it!
Overall, I spent around $45 with my biggest expense being the fabric and foam. I used coupons for both at Hancock Fabrics. The fabric was 40% off but I asked if I could use a 50% off a regular priced item instead and they let me so that I saved 50% instead of 40%. I could have really saved if I bought cheaper fabric, but I wanted this one as it is a heavy, home decor fabric. All of the tools I used I already had so that saved money.
This space in our den is an area I have lots of plans to improve. This is just the starting point!
Have you ever recovered a bench or updated a piece of furniture? Or maybe you have a piece that needs its own makeover! Share with us!


That looks great!
ReplyDeleteThank you, Allie! My daughter has certainly been enjoying it and it just looks so much nicer in that space already. I can't wait to do more projects to update the area. ;)
Delete