Cheesy Chicken Alfredo Bake

Today is our 100th post! Yay! I have been out of town for the last week so I am sharing a simple recipe today that I know you will like. It is one that is good to take to families when someone has had surgery, a baby has been born, or whatever. It has become one of those dishes that I get asked the recipe for every time. It also is a recipe that my whole family loves which becomes an instant winner!

Cheesy Chicken Alfredo Bake
printable recipe here

1 (16-ounce) package penne or elbow macaroni (or your favorite gluten free pasta)
2 (10-ounce) containers refrigerated Alfredo sauce
1 (8-ounce) container sour cream
2 garlic cloves, minced
3 cups cooked chicken, chopped
2 large eggs, lightly beaten
1/4 cup grated Parmesan cheese
1/4 cup chopped fresh parsley
2 cups mozzarella cheese, separated
Salt & pepper, to taste

Prepare pasta according to package directions; drain and return to pot. Stir together all ingredients except only 1 cup mozzarella cheese. Spread mixture into a lightly greased 13 x 9 inch baking dish. Sprinkle evenly with remaining mozzarella cheese. Bake at 350° for 30 minutes or until bubbly.

Serves 10-12

When I take it as a meal to someone's house, I usually take it unbaked and let them bake it when they are ready. That way it is fresh and ready to go when they want it. I usually serve it with a salad.

Other notes: I have used jarred Alfredo sauce with no problem if I cannot find refrigerated. I have also used dried parsley when again I cannot find fresh parsley at the grocery store. To make things easier I love using a rotisserie chicken for this and then use the leftover bones and pieces to make Chicken Stock in the Slow Cooker.

Do you have a recipe that has become a favorite that you make for others like this? I love finding new recipes so please share below or tell me about it on our Facebook page!

Homemade Electrolyte Drink

Hey there! Amanda here (Leslie’s crafty impaired friend). I’m back with another guest post today.

I am excited to share my homemade electrolyte drink. Ever had the dreaded stomach bug or the flu? I would say that just about all our readers have had either at some point in their life. I can remember as a little girl drinking lots of ginger ale when I was sick. To this day, I still cannot drink that stuff without bringing back horrible memories of being sick. As soon as I started feeling better, momma would start pushing the fluids. Funny how a certain food or drink can spark those memories.

But as I have learned this past year in my quest to make better choices for my health, many so called electrolyte drinks tend to have added chemicals and plenty of added sugar. So I decided to come up with my own natural electrolyte drink. Not only is it healthy, it is also delicious!

So what are electrolytes and why are they important? Without giving a chemistry lesson that I am not qualified to give, let me give you a quick intro to electrolytes. Electrolytes are positively and negatively charged particles (ions) that are formed when mineral or other salts dissolve and separate in water. They allow our cells to generate energy, maintain stability, and to function in general. They are essential for normal function of our cells and our organs. These little guys can quickly become imbalanced after profuse sweating or a quick loss of fluids. There are several electrolytes in our body and each serve a unique purpose. The most common electrolytes are sodium and potassium.

So why not just pick up some sports drinks to help replenish fluids? I am so glad you asked! Take a look at the ingredients of a popular sports drink: Water, Sugar, Dextrose, Citric Acid, Natural Flavor, Salt, Sodium Citrate, Monopotassium Phosphate, Gum Arabic, Glycerol Ester of Rosin, Yellow 5.

Let’s start with the sugar content. This particular drink contains 34g of sugar in only 20 ounces. One Twinkie only contains 19g of sugar! That’s almost two Twinkies! While I could go on for days as to why too much sugar is bad for our health, excess sugar can exacerbate loss of fluids.

Yellow 5 is very common dye processed from coal tar. It is commonly found in processed foods and is banned in some countries. It has been linked to asthma, migraines, cancer, and many other disorders.

Natural Flavors are highly processed by-products of food. These flavors are unregulated and are typically just trade secrets of the product.

Doesn’t all that sound appetizing? Sounds quite scary to me. But not to worry, there is a healthy and all natural alternative. Below you will find my go-to recipe for electrolyte replenishment. I picked citrus fruits as the main ingredient because they are packed with potassium. The Himalayan salt provides the needed sodium. Sugars also play an important part in rehydration. Honey is an all-natural sweetener and is easier for the body to process. Artificial sweeteners should never be used in electrolyte drinks.

Homemade Electrolyte Drink
½ cup fresh squeezed orange juice
¼ cup fresh squeezed lemon juice
1/8 teaspoon Himalayan pink salt (click here to see why I chose Himalayan salt)
16 ounces water (or coconut water)
1 tablespoon honey (or more)

Combine all the ingredients into a blender and serve or you can heat up the ingredients on the stove so that the honey will blend better. Either way is fine.

You can pick up a juicer from Walmart for about $17 or order one (like below) from Amazon.


So give it a try and let me know what you think. You will be pleasantly surprised by how simple and delicious this drink is.

>>>>>>>>>>>>>>>>>>>>>>>>>>>>>>>>>>>>>>>>>>>>>>>>>>>>>>>>>>>>>>>>>>>
Leslie, here. This looks like the perfect alternative to sports drinks since it is all natural and chemical free. My husband likes to drink something other than water to help nourish him while working long days outside in the heat. This is the answer! I am excited to get some oranges and lemons and give it a try!

Thanks to Amanda for writing another post for us. It is great to learn from others! Maybe she will flatter us in the future with another.

Happy Friday!
~Leslie

Canning Paint

Wait! Before you think you can put your paint in a pressure cooker and actually "can" it, please read all of this! lol I do not want to be blamed for any kitchen explosions involving paint

This is something so simple yet it helps with storage space immensely. When we built a house two and a half years ago the painters left us with all the remaining paint cans. It equated to about three five-gallon containers and about six or seven gallon pails. Plus, I had some leftover paint from our old house that I brought with us in our move because it was good colors that I thought I may be able to use for crafty endeavors. I kept the bold reds from my old kitchen, the calming blue from the kids' old bathroom and the happy green from my old laundry room. Obviously, all of this took up a lot of space.

It does not take long and it does not cost a lot. I used quart Mason jars that I bought a dozen for around $10 at Walmart. You may be able to find them cheaper during canning season and of course even cheaper at yard sales (and maybe free from your mama, grandmother, or a friend). The lids come with them, but I have traded out some of the regular canning lids for these plastic lids I found on Amazon. (I recently saw some in the canning section at Walmart too.) I need to buy more because I prefer them and love using them for all the things I store in my Mason jars (of all sizes).

To do it, just make sure you thoroughly stir or shake the can of paint you want to transfer to a jar. I transferred cans that were less than half full. Remember, there are four quarts in a gallon but most of my cans had around a quart left. I did get into my large five-gallon buckets and stirred and stirred until it was mixed and used a plastic cup to scoop out paint to pour into a jar. I did this because these were main colors used in our house and I knew over time it would be much easier to get to when we needed to touch up.

I transferred all the information from the top of the paint can onto a label to place on my jars so I know the paint brand, paint sheen, color name, paint formula (because paint names come and go), what rooms I used the paint in, and even the date of when I bought the paint.

Why I like this idea:
1. It takes up so much less room than all the cans!
2. It looks prettier. I realize the colors will separate some and not look as pretty but they still visually look nice.
3. I hate how paint cans rust and when you open them later to touch-up the rust falls into the paint. Yes, I said "hate". I don't usually use that word unless it's something I reeeeeally HATE.
4. You can reuse the jars for storing more paint or for something else when you use up the paint.
5. When touching up, it's easier to shake and mix up a smaller container of paint.
6. It is also easier to walk around with a jar of paint and a foam brush instead of a bulky paint can. I usually use craft brushes for small touch-ups as I'm lazy and hate detest cleaning up regular paint brushes. I could use the "h" word here again but won't. ;)
7. You can just unscrew the lid and not go find a screwdriver or one of those paint can openers when you need to get to it.

Recently, a rather dark mark mysteriously appeared on a wall in our garage entry/kitchen area. It was in one of those places where it was VERY noticeable. Things like that drive me crazy. I tried cleaning it off with a couple of different things with no luck. Finally, I found the canned paint jar whose label said was the main level paint color.

I shook, shook, shook, then got a foam craft brush and used just the paint in the lid to cover the spot. I proceeded to walk around the house like a detective looking for more places to repaint. Hey, you know how it is. When you get in the mood or the gumption to do something like that you have to take advantage of the situation. It was nice to go ahead and touch up a few other inconspicuous places that no one else would have noticed but I had seen over the last few months.

It was easy peasy to take care of and that's why I like it among all the other reasons I gave above. Try it out yourself and see how much better it works out for you!

The Steady Stream of Summer Activities

Looking at my calendar from this past week, I realized that the steady stream of summer activities has begun. Birthdays, short trips to visit family, camp, vacations, VBS, etc. Was your last week as busy as mine?

Here's a rundown of our last week.....

My daughter, Elizabeth, turned 15 last Thursday (May 21st) so we celebrated by inviting six friends to spend the night on Friday. Only four could come so we picked them up and we all went out to dinner. Then the fun started.

They hung out and talked for a while (this was a staged photo, lol)....

We play flashlight tag for two hours. We had intended on playing some other nighttime games, but one team had a hard time finding the other cheating team on 17 acres. Go figure.

Three of us in the household (Wade, Andrew, and I) were asleep by midnight but I think the girls were up to almost three a.m. so that made for a late morning for them. They skipped breakfast and waited until our family came at lunch for the party.
My girl is fifteen. Boohoo! This is her smirking while we were singing the birthday song.

She has always had a "I really don't want to hear you singing this song" reaction. Age four.

About the staying up so late. I told them they could stay up as late as they wanted AS LONG AS I did NOT hear them. Last year, when they all spent the night I was telling them to be quiet at 12:00 a.m., 1:00 a.m., and 2:00 a.m. You can bet that by 2:00 a.m., I was not a happy camper (no pun intended).

Walking down to the den where they all had their sleeping bags laid out, I still had my mouth guard in as I yelled, "Goeth to sleepth now! Elizabethth, you willth noth have anyone spendth the nighth again if youth cannot obey!" (Remember, I had my mouth guard in which makes me sound like I have three pieces of Hubba Bubba in my mouth.) Yes, it was my daughter I had heard cackling the loudest. I don't know where she gets it.....

The party and guests were all gone by about 1:30. The rest of the day was very relaxing since my house was clean! Yay for a clean house on the weekend!

That evening, Jax, our dog, and I took a walk. (He made his debut here when I shared one of his favorite homemade dog treats.) As I was trying to snap a picture of this large branch that had fallen from a tree a couple nights prior, we happened upon a turkey. Doesn't it look cool?

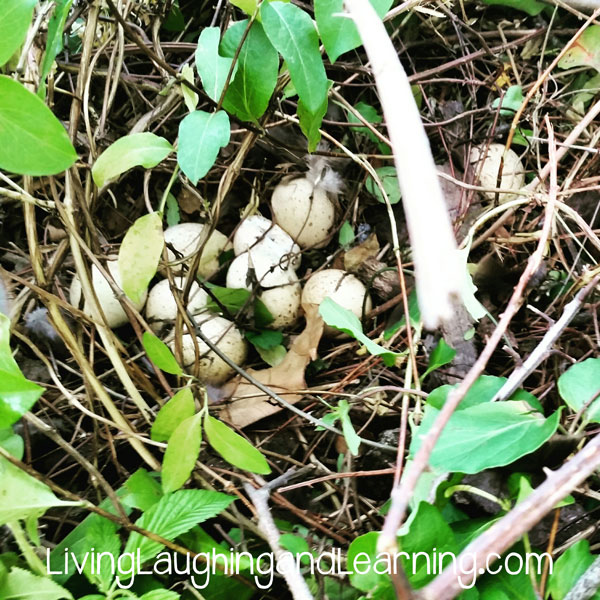
However, after the turkey flew off, he started going wild in the brush where the turkey had been hiding. With all his doggy hysterics, I realized the turkey must have had a nest. Going in to get Jax out of the way, I discovered nine eggs. There had been ten but he had already got one and broke it open before I realized what was happening. This was exciting for me to discover. We have had baby turkey poults on our farm before and they are fun to watch.

Wade, my husband, is a big Vanderbilt fan, so he watched the SEC Championship baseball game that afternoon they were playing in. Oh, and he also checked on his "boys."
Meet 172, 176, 289, 219.....
And meet "Eyebrows." I promised I wouldn't name the steers but....can you say you blame me??
This is not the best photo because I had zoomed in with my phone.
I haven't been able to get him to eat out of my hand yet like some of the others.
We're getting there though.

By that evening, Wade had told me he wanted to drive down to Alabama the next morning to watch Vanderbilt in the playoff game. In our 19 years of marriage, my man has not asked for much. Granted, when he does ask for something it has a pretty high price tag (Scag mower, tractor, ten head of cattle....).

Wade and Andrew were on the road by 7:30 Sunday morning for the game. Elizabeth and I left that afternoon heading toward middle Tennessee to visit Wade's family. See, we had plans to work cattle on Monday. The boys got there late that night (after Vanderbilt had lost but isn't that how it always goes?).

Monday, May 25th was our 19th anniversary! And as I mentioned, guess what we did to celebrate?

We worked cattle at the family farm starting at 6 a.m.! I told him he must have married a good woman who will spend her anniversary doctoring cattle. Thankfully, we only had about 60 cows to come through the head catch so it was an easy morning. In fact, we were done by lunch. An easy day of working cattle for sure. Plus, we had a couple extra guys working with us this year. Plus, the weather was amazing with a constant breeze, overcast, and mild temperatures.
This was the first lucky cow. Really, it IS best to be first and get it over!

A bit about the family farm....it's in the Sequatchie Valley and is about 320 acres. It's a beautiful piece of property. There are two old homesites on the farm as well as an old family cemetery where Wade's three times great grandfather is buried. His family has been farming there for 175 years, possibly longer but I have his great-great-great grandfather living there as early as 1840.

I think the old head catch is almost as old as the family farm. I jest. BUT as you can see above, we got a new one for the farm. Well, Wade wanted the old one to take back home to our farm. Can you tell I was none too thrilled? He thinks it'll be just fine for our small operation.

After cooking out that evening with the family we decided the traffic would be easier at night than in the morning so we headed back home. It took just a bit longer since Wade was pulling a trailer with the heavy head catch. It weighs about a ton. I followed far behind in case it decided to jump off the trailer. ;)

He and I unloaded it the next day. You see it took about five the day before. But alas, when a woman is involved, she can do the work of four. Ha ha ha. Just kidding, to all my men readers.

This week has been fairly low key. I put on makeup for the first time since Monday. To me that is an awesome week. On a walk with Gaby and Dory today (the cats), I went to check on the turkey nest and found all the eggs had been broken. :( I was wondering if it would make it with all the opossums and raccoons we have. The mama in me makes me sad for the hen. Who even knows if the eggs were fertilized though? I told Wade I should have taken them while they were available for some omelets. He made a funny "yuck" face, and I told him, "What you don't know, won't hurt you!"

If you have read this far, I thank you. I thought I would take the week "off" and do what I'm thinking of as a "personality" post. It's a chance for you to get to know us better. If you follow us on Instagram, you may have seen some of these photos.

Next week we'll resume some type of informational something or other so that maybe I can show you something I made (food or DIY) or something I discovered that I hope you like.

How was your past week? Do you have any plans for the weekend? Life is getting busied back up tomorrow after a few days of rest. I will have to put on makeup again tomorrow. *sigh*

Using Essential Oils to Make Car Travel Easier

It is that time of the year when traveling is gearing up for many families with kids being out of school. The ocean waters have warmed up, the trees along hiking paths have grown leaves for shade, and distance relatives know you no longer have an excuse to not visit. (We are about to go see some of ours finally!)

I have something to admit regarding all this. I am not a good traveler. Ask my friends. Ask my family. Ask my husband.

This probably stems from my childhood and my problem with getting carsick. Like seriously carsick.

We had a Subaru station wagon during my childhood. With me being the youngest of three kids, I sat in the back middle. That was advantageous being one who was carsick frequently since I needed to see out the front window. It was NOT advantageous to my brother and sister on either side when I told my dad numerous times he needed to pull over because I felt sick.

Soon he decided he was not going to pull over anymore and made me keep a plastic bag under my seat. True story.

So there were times I would feel like I needed to throw up because I grew so sick. I would take out my bag, do my business, and my parents would throw it away. (I wonder if my carsickness had anything to do with any particular parent’s driving???)

There are things that do make traveling easier for me though. I love a good audio book. I love having someone to talk laugh with during the trip. I love a comfortable ride (perfect temperature, seat at the right angle, etc). Really, it’s best if I can sit in the front seat too.

I have found essential oils can be beneficial to traveling, making that trip much easier whether it’s to the grocery store with a fussy child or driving cross-country with your family.


Fatigue (or Tired or Sleepy)
Are you feeling tired and you are the driver? Try Peppermint, Joyful blend, Invigorating blend, Basil, Lemon, and Rosemary.

Stress (or Road Rage)
Are you feeling stressed in traffic? Try citrus oils (Grapefruit, Bergamot, Orange, etc), Joyful blend, Balance, or Invigorating blend to help reduce stress.

Carsick
For general carsickness, try inhaling Peppermint and Ginger. Also, keeping the car cooler inside helps with carsickness. Make sure anyone who suffers from it can see out a window as well (sitting in the front or middle so they can look straight ahead out the window). The two mentioned oils along with Digestive blend can also be put in water or on your abdomen to help with that queasy feeling from nausea as well.

Grumpy Kids
Lavender is very soothing for kids helping to calm and relax. Rub it on their feet or give them an empty bottle that still has enough residue so they can hold the empty bottle but inhale for aromatherapy benefits. Other recommendations to help calm and soothe is Calming blend, Grounding blend, Geranium, Ylang Ylang or Cedarwood. Be careful not to diffuse some of these oils as they can make everyone in the car relaxed or drowsy, and we do not want the driver getting sleepy! It’s best to let them have something where they can personally inhale it or rub it on their feet, behind their ears, back of the neck, etc.

Other Issues Like Mine!
I think I suffer from some sort of personal syndrome while traveling. lol If I barely go over two hours in the car, I usually get a fuzzy head accompanied by a headache and pressure in my sinus area. Anyone else get this? I thought there with all my wonderful “miracle” essential oils, there HAD to be something that would help this.

I tried Respiratory blend to help maintain clear airways and breathing. It helped but did not prevent it or make it go away completely. I tried Peppermint because it often helps to soothe my headaches. Same thing. So then I tried a combination of Orange and Peppermint. IT DID THE TRICK!

You could use a car diffuser or do like me and just wear a diffuser necklace. (Those things actually work!) If I feel like I’m getting a little fuzzy headed, I just pick it up and sniiiiiiiffffffff! It has brought several laughs from my family when I do it. But it works and it has made my traveling so much better. I still have to be careful on the carsick thing though (no reading or looking down much).

Diffusing Oils in the Car
* You can use a diffuser necklace as I mentioned above. I found mine on Etsy.
* There are plug in car diffusers such as this one on Amazon. Here is another brand on Amazon.
* Kristy also shared an easy-peasy way to make a diffuser for your car.
* Or just stick a cotton ball in the air vent with some oils dripped on it.
* There are cotton inhalers you can buy where you put a few drops of oils on it and put it just inside your nose to inhale. Here are some on Amazon.
* Another idea is to buy a little spritzer bottle (available at Wal-mart for less than a dollar in the travel section) and add a few drops of essential oils with distilled water. Be careful not to spray it where it gets in someone’s eyes. Follow my directions from my post, Room Spray Alternative, to make a simple spray for the car.

Other things to consider packing while traveling are essential oils that act as natural insect repellents, help ease sunburn, support healing, relax/calm to help with sleep issues (because there’s no bed like YOUR bed!), help with digestive issues from all that eating out while away from home, immune support in case you feel like you’re coming down with something while away, and oils to help cool you down in the summer heat.

Do not forget to pack your diffuser if you love yours like I do mine. It has come in handy while staying at hotels that seemed to smell stale or had a chemical smell from the cleaners. I have two from an essential oil company that I like and can personally recommend, but I also have this one from Amazon and it has worked wonderfully.

Essential Oil Etiquette
Remember to be respectful of others when using essential oils. Even though they are natural, some people are sensitive even to those smells. For example, Patchouli and Ylang Ylang give me headaches. Just keep that in mind when using them around people who you may not have used them around before.

Essential Oil Storage
Also, be cautious of leaving your essential oils in your hot car. Over time the heat can break down your oils and possibly cause chemical changes. Put them in your purse or backpack if you are leaving your car for long periods.

Here’s what I usually carry when I am traveling with my essential oils. I would love to bring more. I used to carry an eight vial key chain but upgraded to this because I wanted MORE!!
This is the size of a check book so it fits great in my purse.

There are also some tips I would like to share in the future on using essential oils when you are flying including how to get through the airport with them in your carry on. As with traveling by car, they can make your travel by air much more relaxed and enjoyable!

What are your must haves while traveling? Do you have any tips to share with me for when you are traveling? Please do either below or find me on Facebook!

P.S. If you are interested in purchasing essential oils, please email me with questions!
 
Google+